Workbench
Vises and clamps for a garage workbench
Start a garage bench with one vise and a handful of clamps. For wood, a front woodworking vise such as the IRWIN 6-1/2 in or the Grizzly H7788 cabinetmaker vise; for metal and general work, a 5 in swivel vise such as the Nakkaa or the Grizzly T33818. Mount it over a leg on a bench that does not rack, and add 36 in parallel bar clamps for glue-ups and a clamp kit with 24 and 40 in bars.
Which vise should a garage workbench have?
It depends on what you hold. A woodworking vise has smooth, wide jaws that grip a board without marring it, often with wooden faces and a quick-release screw, and it mounts so the jaws sit flush with the bench top for planing and chopping. A metalworking vise has steel jaws, serrated faces and often an anvil or a swivel base, and it takes hammering and filing. A garage bench that does both takes the metal vise as the workhorse and adds soft jaw covers for wood; a shop that does fine woodworking adds a woodworking vise.
The four vises in our data cover the choice. For wood: the IRWIN Woodworker's Vise, 6-1/2 in (226361), and the Grizzly H7788 cabinetmaker's vise, which is the step up for joinery. For metal and general work: the Nakkaa 5 in ductile cast iron bench vise with a 360 degree swivel lock base, and the Grizzly T33818, a 5 in industrial 360-degree swivel base drop-forged workbench vise. For the drill press, the PONY 4 in drill press vise holds small parts. Compare the lines side by side on the buy cards; a Grizzly button and an Amazon button show on each. Jaw opening, weight and mounting dimensions are on each listing and not in our data, so read them before you plan the bench.
Where to mount a vise
Mounting is more important than the vise. A vise is a lever, and the force goes into the bench. The rules:
- Over a leg. Mount the vise at the front corner directly over a leg, so the load goes straight to the floor. A vise in the middle of a long top acts on a flexible span and the bench bounces.
- At the end of the bench. The end clears the work, lets long boards extend past the leg and keeps the vise from interfering with the main bench surface. For a right-handed person, the left end is common; mount it where it suits your work.
- Jaw height. For a woodworking vise, the top of the jaws is flush with the bench top (a wooden face lets you plane over it). For a metal vise, the top of the jaws is usually proud of the bench, and elbow height is the guide: a vise's jaws at about elbow height suit filing and fine work, lower suits hammering and chopping. See workbench height.
- Through-bolts. Bolt the vise through the top with washers and nuts or lag screws into thick framing. Wood screws alone will tear out under load. A thick top or a plate underneath spreads the load.
- Space around it. Leave room for the handle to swing, for a long piece to stick out, and for you to stand square. Check the bench against the wall and the car.
The bench must be heavy or anchored. A vise on a light bench slides across the slab. Bolt the bench to a wall stud or add weight low; see metalworking bench for a garage machine shop. A fold-down bench or a rolling bench takes only a small, light vise at the end near a support; see fold-down and rolling notes.
Clamps: the types that earn their place
A bench with a vise and no clamps is half a holding system. Clamps do the jobs the vise cannot: hold a board to the top, press a glue-up together, hold a fence to a saw table, tack parts for welding. The types that matter in a garage:
- Parallel bar clamps. Jaws stay parallel and square, so a panel glue-up comes out flat. The JORGENSEN 36 in parallel bar clamps, 2-pack list a 2,200 lb load limit. Four to six in the 24 to 48 in range cover most panels and cabinet boxes.
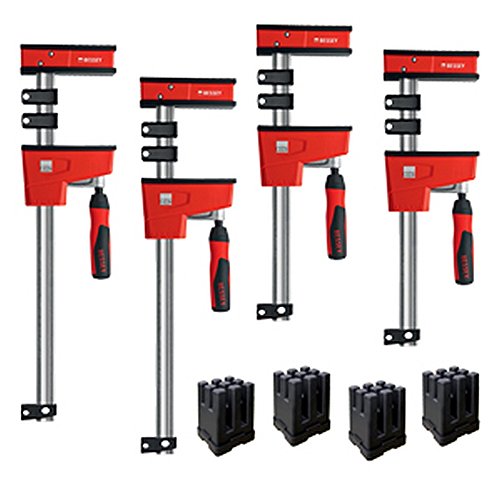
- K-body style clamps. The BESSEY K Body REVO kit with 2 x 24 in, 2 x 40 in bars and a set of KP blocks is a kit of parallel-jaw clamps for cabinet work and glue-ups. The listing gives the details.
- F-clamps and C-clamps. General-purpose, strong and cheap. Hold a part to the bench, a fence to a table or a bracket to a frame. Keep a mixed set in 4, 6 and 12 in sizes.
- Quick-grip (trigger) clamps. One-handed, light, ideal for holding a part while you reach for a screw. They are not for glue pressure.
- Pipe clamps. Use black pipe of your own length with clamp heads; cheap for long glue-ups. Mind iron stains on wood from the pipe.
- Spring clamps and hand screws. Light holding, and hand screws spread pressure across wooden jaws.
- Welding clamps and magnets. For a steel table, locking pliers, welding clamps and magnetic squares hold parts for tacking; see welding table for a garage.
How many clamps? More than you think. A rule of thumb for edge-gluing is one clamp every 8 to 12 in along the joint, alternating above and below the panel to keep it flat. A 36 in panel wants four clamps across. A cabinet box wants at least four. Start with four 36 in parallel clamps, add a K-body kit, and build up as you hit limits.
Vises and clamps


Prices change often; the button shows today's price on Amazon.
Amazon and Grizzly, side by side
Each card shows an Amazon pick and a Grizzly Industrial pick for the same job.
Woodworking vise
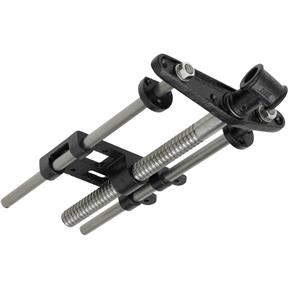
The Amazon vise is a basic front vise; the Grizzly cabinetmaker vise is the better-rated step up if you do fine joinery.
5 in swivel bench vise
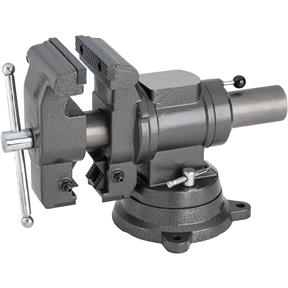
Both are 5 in vises with a 360 degree swivel base. The Grizzly one is a drop-forged industrial unit; the Amazon one is a lower-priced 5 in cast-iron vise.
Prices change often and Grizzly runs sales, so the buttons show current prices.
A holding-system plan by trade
Woodworking. A front woodworking vise on the left end, two or three 36 in bar clamps, a kit of 24 and 40 in parallel clamps and a few F-clamps. Add bench dogs and holes if the top allows. See best garage workbench for benches with a top that takes a vise.
Machine shop. A 5 in swivel vise on the heavy bench, a drill press vise, parallels and clamps. The Nakkaa and T33818 are 5 in swivel vises. Mount them where the swing clears the wall. A mill uses its own vise, which is a separate purchase and not in our catalog; check your mill's table (the G0704 lists a table of 7-1/16 x 26-5/8 in and an R-8 spindle).
Welding and fab. The vise goes at one end of the steel table or on a separate post, away from the weld zone because spatter ruins the screw. Lots of locking clamps and magnets.
Auto. A heavy 5 in vise on a bench near the door, for bolts, brackets and bearings. Keep it off the oily floor; a mat under it reduces slipping.
Mixed. One metal vise with soft jaw liners, a handful of bar and F-clamps and a drill press vise. That covers the most work in the least space.
Storing clamps and vises on the wall
Clamps are bulky and heavy, so how they hang decides whether the bench stays clear. A wall rack or a French cleat holder keeps parallel clamps on their sides, grouped by length, within reach of the bench. A pegboard hook holds light clamps; heavy bar clamps need a rack that bolts into studs. A rack above the bench, at 60 to 72 in, keeps them out of the way, and a rack on the end of the bench keeps the longest clamps vertical. Pegboard such as the Spampur metal pegboard can carry hooks for small clamps; see garage workbench and storage.
Protect the tools. Clamps and vises rust in a damp garage; wipe the screws and slides with a light oil, and use an inhibitor such as Boeshield T-9 on bare steel. Keep a vise's screw clean and lubricated, and close the jaws a little when idle so the screw is not carrying the full weight of an open jaw. Replace worn jaw liners so serrated faces do not mark your work. See garage shop moisture and rust.
Think about the car. A rack that hangs over the car's bumper or beside the door swing is a hazard. Keep heavy clamps low on the wall and out of the 30 in walk-around. The organization guide shows the wall bands.
Safety with vises and clamps
- Do not over-tighten a vise with a cheater pipe; it breaks screws and jaws.
- Keep fingers out of the closing jaws and the pinch points of clamps.
- Support long pieces so they do not tip the vise or the bench.
- Do not hammer on a woodworking vise; use the anvil face of a metal vise for that.
- Keep the bench anchored or heavy when you work against the vise.
- Wear eye protection for any work that chips, grinds or hammers (NoCry clear glasses).
- Check bar clamps for bent bars and worn screws, and replace them.
For choosing benches that carry a vise, see garage workbench top ideas and how deep should a garage workbench be: a 24 in deep bench is the right size for vise work.
Common mistakes with vises and clamps
Most vise and clamp problems come from a handful of habits, and each one is cheap to avoid.
- Buying the vise before the bench. A vise is only as good as what it is bolted to. A 5 in cast-iron vise on a light bench slides, racks and rattles. Decide the bench first, or buy them together, and use the bench depth guidance in how deep should a garage workbench be.
- Mounting in the middle of the span. The force goes into the top between the legs and the whole bench springs. Move the vise over a leg.
- Using bar clamps as vises. Bar clamps hold a glue-up under light pressure. Hammering or filing against a part held in a bar clamp loosens the clamp and bends the bar.
- Over-tightening. Hand pressure is enough. A cheater pipe on a vise handle breaks the screw or the jaw casting, and over-tightened clamps crush the wood fibers and starve the glue joint.
- Marring the work. Serrated steel jaws bite soft wood and soft metals. Keep soft jaw liners (wood, leather, aluminum or rubber-faced) and fit them whenever the finish matters.
- Letting the screw rust. A vise screw and a clamp screw in a damp garage seize. Wipe them and add a drop of light oil. See garage shop moisture and rust.
- Buying too few clamps. The glue sets while you hunt for the next clamp. Lay out and dry-fit with every clamp you will use before the glue comes out.
A short test before you buy: put the vise or clamp in your hand and work the screw. It should turn smoothly, the jaws should close parallel with no gap at the tips, and nothing should wobble. The listing gives the jaw width, the opening and the weight; match them to the largest piece you expect to hold, with room to spare.
Get the garage shop planning checklist
One printable page: measure the bay, count the circuits, list the machines, check the floor. Plus a few short emails, then a couple a month at most.
Unsubscribe anytime. You can also just read the checklist on this site.Frequently asked questions
What size vise do I need for a garage workbench?
A 5 in vise suits general and metal work, and a 6-1/2 in woodworking vise suits wood. Mount over a leg on a heavy or anchored bench. Check jaw opening and weight on the listing.
Should I get a woodworking vise or a metal vise?
If you mostly work wood, a woodworking vise with wide smooth jaws. If you work metal or do general repair, a 5 in swivel metal vise. Many garages use the metal vise with soft jaw liners for both.
How many clamps do I need to start?
Four 36 in parallel bar clamps, a K-body kit with 24 and 40 in bars, and a mixed set of F-clamps and C-clamps. Add more when a glue-up runs short.
Where should I mount a vise on a workbench?
At the front corner or end, directly over a leg, through-bolted with washers into a thick top. A vise in the middle of a long span makes the bench bounce.
Can I mount a heavy vise on a fold-down or rolling bench?
Only a small vise near a support, with light work. A heavy vise puts large forces on hinges and casters, so use a fixed or anchored bench for hammering and filing.
This page is researched guidance, not professional electrical, engineering or safety advice. Circuits, loads and clearances depend on your house, your service and your town: have a licensed electrician confirm any wiring, and check local code and each manufacturer's manual before you act.